Well, I had good intentions of getting that photo-a-day done, but life got in the way.    It was totally good life getting in the way, though.  I spent lots of holiday time with my family this year.

I hope you had a great Christmas holiday like I did.

On Christmas Eve morning, my brother called to ask me to make a card for him to give to our Dad.

If you know my dad, you know that the card needed to have a chocolate theme.

So I pulled out the cute new Scentsational Season Clear-Mount Bundle and made this "Make Your own Cup of Cocoa" card.


You have the option of adding to your cocoa mug
~ a marshmallow
~ extra chocolate
~ whipping cream (vanilla scented, thanks to the vanilla scented embossing powder)
~ a peppermint stick


I think my chocholic dad will like this card as much as I do.

Day 4

(Day 3 was Presents.  We don't have any wrapped yet so I skipped the day and will make it up later.)

Today is day 4: Tradition


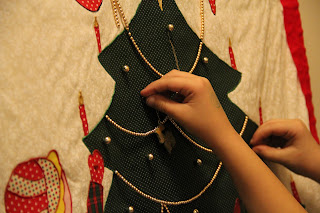
This countdown calendar was made by my Aunt Nori and given to my parents when I was young.  
Every day in December, we would hang a mini ornament onto one of the gold beads on this tree.  
Now I've inherited this calendar and my kids are using it to count down the days until Christmas.

That's 19 days at this point, by the way.  

Need ideas for stocking stuffers or gifts for the crafters and scrapbookers in your life?  
Click the Shop Now button in the top right corner, or feel free to contact me for ideas.

Happy Holidays!


Christmas Photo-a-day

So, this isn't Stampin' Up! related, but I've decided to do a 25 day Christmas photo-a-day challenge this December.  I was almost foiled by a severe cold, though!  On the first day I felt too horrible to do anything.  Today I am much better, so I'm posting day one and two together today.

So, here it goes:

Here are the guidelines for the challenge:


Here's my picture for Day 1, lights:

These are the lights on my Christmas tree.  
I wanted to see if I could get them blurry, and I'm pretty happy with this picture.

Here's Day 2: Decorations

This is a simple little nativity I made. 
I LOVE nativities and collect them. 
I came up with the idea for this one recently, and am really liking it.  
They're little wooden balls.  Joseph and Mary are about an inch, the baby Jesus is about 1/2 inch.

See you tomorrow for Day 3!

December Blog Hop!

Its blog hop time again!

This month I am the last stop, so you may have linked here from Jill's blog.

In keeping with the holiday season, our theme this month is gift-ables.

I decided to share these adorable ornaments that I made for a workshop last year.


Isn't that cute?

And its as easy as can be.

You will need:

~ glass ball ornaments
~ Designer Series Paper of your choice
(may I recommend Be of Good Cheer
~ ribbon of your choice
~ jingle bells

1. Cut the paper into 1/2 inch strips using your Stampin' Trimmer.
2. Use your Paper Piercing Tool to curl the paper strips.
3.  Remove the top of the ornament by carefully pinching the wire until it can slip out of the neck of the ball. Insert strips into the top of the ornament.  Paper curls will expand as they settle, so keep this in mind when deciding how many curls to put into the ornament.
4. Carefully remove the wire from the metal cap of the ornament and slip the bell onto it before replacing the wire into the metal cap.
5. Reassemble ornament by pinching the wire slightly and slipping it into the ball, taking care bot to catch the metal cap inside the ball.
6. Cut a piece of ribbon to your desired length.  Briefly expose to flame (I use lighter) to seal the cut ends of the ribbon.  Tie onto ornament wire as desired.

I hope you like my cute and easy Christmas gift idea!

Want more holiday ideas?
 How about a partridge in a pear tree?

For even more ideas, check back often in December.

Happy Holidays!

Didn't make it to all of the stops on our hop?
Well, here's where to go:
1. Maxine Conrad  www.stamptothemax.com
2. Martha Haddock   www.stampinmartha.blogspot.com
3. Lisa Fennewald   www.lisaloostamps.blogspot.com
4. Jill St. Angelo  www.jillsstampingcorner.com
5.  Stephanie Bradley  (you are here)


Welcome to our Stamp to the MAX blog hop! 
We hope you are inspired by our Christmas cards.
You may have arrived here from Laura's blog. 
I am stop #4  on the blog hop.

 On the first day of Christmas,
my true love gave to me

...this sweet little partridge in his pear tree.

Supplies:

Chocolate Chip Card Stock
Very Vanilla Smooth Card Stock
Cherry Cobbler Card Stock
Old Olive Card Stock

Cherry Cobbler Baker's Twine
Basic Pearls Jewel Accents
3/16" Metallic Brads 

Bird Punch

Language Of Friendship - Clear-Mount Stamp
Petite Pairs - Clear-Mount Stamp
Take Care Clear-Mount Stamp Set  
Chocolate Chip Classic Stampin' Pad

Jet Black StāzOn Pad
Soft Suede Stampin' Write Marker 
Real Red Stampin' Write Marker
Baja Breeze Stampin' Write Marker


The next stop on the hop is Martha.  Click her name to get to her blog.

Thanks for hopping by!
Click here to shop online 24/7
Check out the Holiday Catalog by clicking here.

Here are the other stops on the hop.  Feel free to take a look at them all!

Maxine Conrad     www.stamptothemax.com 
 Edie Bunting   www.ediestamps.blogspot.com
 Laura Widdison  www.stampprincess.com
 Martha Haddock  www.stampinmartha.blogspot.com
 Christina Mansker  www.crazystampmom.blogspot.com
 Jill St. Angelo  www.jillsstampingcorner.com
 Elizabeth Harris www.elizabethloves2stamp.com

Thanksgiving blog hop

Welcome to our Stamp to the MAX blog hop! 
We hope you are inspired by our projects with a Thanksgiving / Thanks theme! 
You may have arrived here from Jill's blog. 
I am stop #6  on the blog hop. 
 
 I made a Thanksgiving tree.
 
This could be used as a centerpiece or just set beside the front door.
Mine is more than 4 feet tall, but that would vary depending on your branches.
My branches were gathered by my brother in law Joe, who did a great job selecting them!
I arranged the branches how I liked them, then hot-glued them near the bottom and wrapped the hot glue with ribbon to get them to stay together.  
I put them into a flowerpot and filled the bottom with some pretty small rocks.
 

I cut the leaves from the Comfort Cafe DSP using the Autumn Accents Bigz Die.
 
 
I distressed the edges with Ink in Soft Suede, Old Olive, Summer Starfruit, and Pumpkin Pie.
 

I glued the leaves to the branches, then tied a know of Linen Thread around the stem of each leaf.
 

I cut the "Thankful"from chipboard using the Typeset Alphabet die, covered the front of the letters with Versa Mark Ink, and then Gold Embossing Powder and heat embossed them with the Heat Tool.
 
 
I strung them between 2 branches with some Linen Thread.

I covered the flower pot with some Old Olive Fabric from the Essentials Designer Fabric pack and tied it with Early Espresso and Daffodil Delight 1/8 inch Taffeta Ribbon.


I hope you like my Thanksgiving tree!

The next stop on the hop is Elizabeth.  Click her name to get to her blog.

Thanks for hopping by!
Click here to shop online 24/7
Check out the Holiday Catalog by clicking here.

Here are the other stops on the hop.  Feel free to take a look at them all!


June is a GREAT month at Stampin' Up!

What makes it so great? Well...


The brand new 2012-2013 catalog is here!
Its been totally re-designed and is full of new products!
Want one in your own hot little hands?
Contact me today!


Been thinking about hosting a Stampin' Up! workshop or class, or just having a fun, crafty girls' night?
Do it in June and you can get an extra $50 in FREE products!


There's never been a better time to Join Stampin' Up!
Even (or especially) if you just want a discount on the stuff you buy.
You can join for just $99
and you get to choose EVERY PRODUCT that comes in your starter kit!!!
AND if you sign up in June, you get extra FREE products!


Stamp to the Max blog hop!

Welcome to our Stamp to the MAX blog hop! 
We hope you are inspired by our projects using products from the 2012/13 Catalog.  You may have arrived here from Kim's blog. 
I am stop #4  on the blog hop. 

I wanted to see what (other than a purse)I could make with the new

Petite Purse Bigz XL Die 

So, I created


A Doctor's Bag

The "for you" stamp is from the new
Itty Bitty Banners stamp set.


The doctor's bag has a sweet "get well" sentiment inside
from the Petite Pairs stamp set.

Fill it with chocolate kisses
or another treat to help sooth a friend's broken heart.


A Treasure Chest

Fill this cute little guy with chocolate coins or play jewelry
and give it to your guests at a Mermaid or Pirate party.

I scored the Chocolate Chip card stock with the Simply Scored,
and the More Mustard strips are coated with Dazzling Details
to give it just the right look.


and

A Teapot
Tuck a teabag and a packet of honey into this cute little
pot and pass it along to a friend.
The flowers are a stamp from the
 Bordering on Romance stamp set.


I hope you liked my creations!


Join the Fun!

So, you've been wanting to Join Stampin' Up! for a while now, I know.

But, even though the $175 got you almost $400 worth of product, its still $175. 
And you don't really want some of the things that come in the Starter Kit, right?
I know what its like.  I'm one of those who held out on joining the fun because of the cost.

Well, starting today you can become a 
Stampin' Up! Demonstrator for only $99!

And you get to choose all of the products that come in your Starter Kit!
Your choice of up to $125 worth of any current Stampin' Up! products!
It's 100% customized by you!

Even if you're not really looking to be a demonstrator,  
and just want to get some goodies, 
you get $125 worth of Stampin' Up! products for $99!


I really look forward to sharing the Fun of Stampin' Up! with you!


The retired lists are here!

Some items are as much as 70% off!

The retired items can still be ordered through May 31st,
but remember;

  • These items can go quickly, you may not receive all the items you ordered. You will not be charged for these items if this happens.
  • Where possible, please let me know a substitute item in case the original item is no longer available when I place your order. 
  • The lists will be updated by 4:00pm daily.

You can also order online from my store.

Wedding cards

I recently had a hostess request wedding themed cards for her workshop.
Here are the cards we made:


I really like this white-on-white card.

We also made this favor box:


The guests were joking that they were going to put their wedding gifts in these small favor boxes, and the bride suggested that a $100 bill would fit perfectly! :)

Birthday cards!

I signed up for 2 spots in a birthday card swap.  
These are the cards I made:


Don't you LOVE the paper I used for this one?!?
 It's the Everyday Enchantment Designer Series Paper 
that you can only get when you place an order during Sale-a-Bration.

Sale-a-Bration only goes for 2 more weeks, so make sure you don't miss out!

If Dr. Suess wanted you to become a Stampin' Up! Demonstrator:

Congratulations!
Today is your day.
You can be a new Demo!
The Stampin’ Up! way!

There’ll be tips you can read
From Stampin’ Up! news!
You can tailor your workshops
any way that you choose.

You will do it your way.
You know what you know.
As a Stampin’ Up! Demo,
you decide where to go.

You'll be on your way up!
You'll be meeting new friends!
You'll have fun with your upline!
The fun never ends!

You won't lag behind,
because you choose the speed.
You will only hold parties
if you feel the need.

Convention, Regionals and Leadership, too!
Surrounded by stampin’ buddies,
You will never be blue!

So purchase the Kit at one-twenty-five!
If you visit my website,
you won’t have to drive!
You can sign up with the speediest speed.
You can customize your kit
to get just what you need!

And during Sale-A-Bration there is so much more!
There’s Designer Series Paper or Downloads galore!
So don’t hesitate…that’s just not you!
You are a “doer”, so sign up and DO!


If you don’t like it, you can just walk away!
It’s as easy as that…no penalties to pay!
But who doesn’t like getting discounts each order?
On their wood mounts or clear mounts…you can be a paper hoarder!

There are stamps to be inked! And paper to be cut.
With so many colors, you’ll stay out of a rut.
There are new friends to meet. New techniques to try.
I want you to join me….I will not lie!
I will help you to succeed
I will help you. Yes indeed.

So...Today is your day!
Let’s get your kit on its way!
You can be a new demo…
And oh…the places you will go!

~Max Conrad
Joining anytime is great, 
but joining now is fabulous!

Join for Just $125!
Choose from our Starter Kits and join during Sale-A-Bration for just $125 (regularly $175)!
You'll receive product and business supplies valued at over $340, and

Free Products for the Rest of 2012!!!

Besides an amazing price on your starter kit, you'll also get a free pack of Designer Series Paper (excludes Specialty Designer Series Paper) or a digital download every month for the rest of the year! Simply place a demonstrator order each month and you'll be able to choose a qualifying paper or digital download for free! (does not include shipping and handling charges).
Our starter kits are created exclusively for new demonstrators, contain Stampin' Up! essentials you'll need to get started in your new business. You can choose between the standard Starter Kit and the Digital+ Starter Kit. Both Starter Kits are customizable allowing you to choose products that you want to run your business your way.


The standard Starter Kit includes
  • Four complete stamp sets (including a clear-mount set and clear-mount block)
  • A Stampin' Around wheel, handle, and ink cartridge  
  • Assortment of Designer Series Paper and card stock
  • White envelopes (40)
  • Four Classic Stampin' Pads
  • Two Stampin' Write markers
  • VersaMark Pad
  • Whisper White 5/8" satin ribbon
  • Always Bird Décor Elements and applicator
  • Adhesives
  • Blender pen
  • Color Coach
  • Cupcake Punch
  • Stamping sponge
  • Stampin' Scrub and Mist 
  • Box of Idea Book & Catalogs
  • Business forms and tools
The Digital+ Starter Kit includes
  • My Digital Studio digital designing software
  • His & Hers Digital Content Collection DVD
  • One clear-mount stamp set (including a clear-mount block)
  • Assortment of card stock
  • Note cards and envelopes (20)
  • Four Classic Stampin' Pads  
  • Real Red 1/4" grosgrain ribbon
  • Brights Designer Buttons
  • Always Bird Décor Elements and applicator
  • Adhesives
  • Blender Pen
  • Stampin' Scrub and Mist 
  • Box of Idea Book & Catalogs
  • Business forms and tools 
 Plus, if you'd like to add scrapbooking, home décor, or digital designing to your business, 
we also offer three optional add-ons: 
the Stampin' Memories add-on, the Definitely Decorative add-on, and the My Digital Studio add-on. 
These add-ons give you a great sampling of products you can use to showcase Stampin' Up!'s Stampin' Memories, Definitely Decorative, and digital designing lines.

Valentines

I recently spent a day making valentines (and watching Dr. Who...love that crazy Doctor).
Here are some of the valentines I made:


In place of the strawberry part of this stamp, 
I used a heart cut with the Fashionable Hearts Embosslits Die.


This glittery polka-dot Designer Series Paper is from the Holly Berry Suite, 
which was available in the 2011 Holiday Mini catalog.


I love this frame stamp from the Elementary Elegance set.  
You can only get this stamp set during Sale-a-Bration!


These chipboard letters are covered with clear Dazzling Details.


I am especially fond of this card! 
The bucket is one of the cupcake wrapper/bottom stamps 
The plant is from the Valentine Defined stamp set 
which was available in the 2011 Occasions Mini catalog.
The heart was cut and embossed using the 

Now, I know you're really bummed because you can't get that stamp set anymore.
But you CAN still get the digital version of the Valentine Defined stamp set
for My Digital Studio.
AND now you can try MDS for FREE!!!
Click here, then click the MDS Express Trial button on the right


This is a make-and-take I did for a workshop.


This monkey has a small loop of twine behind the heart 
that lets him swing and slide along the Bakers Twine.


These hearts are cut from some felt flowers I got from a Grab Bag.

Are you ready for V-day?


Get a $50 Visa or Mastercard gift card!

Stampin' Up! is in the process of doing research in regard to an item in our product line. They have met with many of our demonstrators in regard to this item in the past. This time, they would like to meet with some of our friends and customers. We are looking for customers with many different levels of experience in paper crafting in general. These people do not necessarily need to be Stampin’ Up! Customers; they can be friends or relatives as well, as long as they have some interest in crafting.

As compensation for attending, you will receive a Visa or MasterCard gift card valued at $50!


Please forward the below link to anyone you feel may be interested. 


This survey will be available to complete until Wednesday, February 1st at midnight.

Please make sure to list me - Stephanie Bradley - as the person who sent you the survey.  (As a demonstrator, I get something for referring you!)

Here is a link to the survey.